Canon AE-1 User Guide: A Comprehensive Overview
Dive into the world of the Canon AE-1! This guide explores its features, from manual focus and aperture control, to mastering exposure and utilizing classic FD lenses.
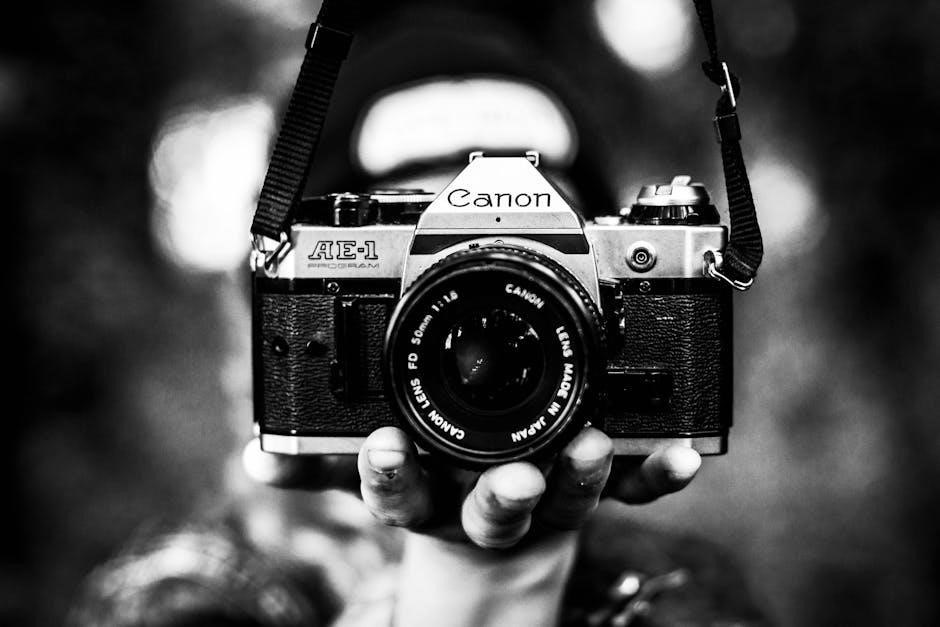
The Canon AE-1, released in 1976, revolutionized photography, bringing advanced features to a wider audience. It wasn’t just nostalgia that drove its popularity; even today, this camera remains remarkably capable. Its blend of manual and automatic controls offered photographers unprecedented creative flexibility. The AE-1’s robust build, a combination of plastic and metal, ensured durability while keeping the camera relatively lightweight at approximately 590g and sized like a small book (141 x 87 x 48 mm).
This guide aims to provide a comprehensive overview of the Canon AE-1, covering everything from understanding its physical characteristics and the Canon FD lens mount, to mastering essential camera settings like ISO, aperture, and shutter speed. We’ll delve into focusing techniques, exposure control, and practical shooting tips, ensuring you can unlock the full potential of this iconic camera. Prepare to rediscover the joy of film photography!

Understanding the Camera Body & Build
The Canon AE-1’s body represents a thoughtful balance between durability and portability. Constructed with a combination of high-quality plastic and metal components, it offers a solid feel without being overly heavy. Its dimensions – 141 x 87 x 48 mm – are comfortable for handling, resembling the size of a small book. Weighing in at approximately 590g, it’s lighter than many modern DSLRs, making it ideal for extended shooting sessions.
The top plate houses the essential controls: shutter speed dial, exposure compensation dial, and the film advance lever. The back features a clear LCD display for metering information. The bottom incorporates the film rewind crank and a tripod mount. This design prioritizes accessibility and ease of use, allowing photographers to quickly adjust settings and focus on capturing the perfect shot. The build quality ensures longevity, making the AE-1 a reliable companion for years to come.
Physical Characteristics & Dimensions
The Canon AE-1 presents a classic SLR form factor, prioritizing both ergonomics and portability. Its body measures 141 millimeters in width, 87 millimeters in height, and 48 millimeters in depth, creating a comfortably sized grip for various hand sizes. The camera’s weight is approximately 590 grams (or 1.3 pounds) without a lens attached, striking a balance between substantial feel and manageable carrying weight.
The predominantly black finish contributes to a timeless aesthetic. The top deck features a prominent film advance lever and a rewind crank, while the rear panel houses the LCD display for metering and settings. The base includes a standard tripod socket for stable shooting; These physical attributes contribute to the AE-1’s enduring appeal, offering a tactile and visually pleasing experience for photographers of all levels.
The Canon FD Lens Mount
The Canon FD (Focusing Distinctive) lens mount is a defining characteristic of the AE-1 system. Introduced in 1971, it offered a robust and mechanically sophisticated connection between the camera body and a wide array of Canon lenses. The FD mount utilizes a three-prong bayonet design, ensuring secure and precise lens attachment.
This mount system allowed for full aperture metering, a significant advantage for photographers. A vast selection of FD lenses were produced, including prime lenses like the highly regarded 50mm f/1.8 and wider options such as the 24mm f/2.8. Adapters are available, allowing the use of modern lenses, but native FD lenses deliver optimal performance. The FD mount represents a pivotal era in Canon’s lens technology, offering quality and versatility.
Essential Camera Settings
Mastering the Canon AE-1 begins with understanding its core settings. The ISO setting must accurately reflect the film speed loaded in the camera – crucial for correct exposure. While the AE-1 offers both manual and automatic aperture control, beginners can start with automatic to familiarize themselves with the system.
Exposure control is paramount; utilize the built-in light meter and consider exposure bracketing – taking shots at slightly different exposures – to ensure a properly exposed image. Shutter speed dictates motion blur or sharpness, and a general rule for handheld shooting is to maintain a speed of 1/60th of a second or faster to avoid camera shake. Experimentation is key to unlocking the AE-1’s full potential!
ISO Setting & Film Compatibility
The Canon AE-1’s ISO setting is fundamental to accurate exposure. It must correspond to the ISO (or ASA) speed printed on your loaded film cartridge – typically 100, 200, or 400. Incorrectly setting the ISO will result in consistently over- or underexposed photographs; The AE-1 is compatible with a wide range of 35mm film, including color negative, color slide (transparency), and black and white films.
When switching film types or speeds, remember to adjust the ISO dial on the top plate accordingly. Bracketing shots around the meter’s reading is always a good practice, especially when using different film stocks. Understanding your film’s characteristics and the AE-1’s ISO setting is the cornerstone of successful photography.

Aperture Control: Manual vs. Automatic
The Canon AE-1 offers both manual and automatic aperture control, providing flexibility for various shooting scenarios. A smaller f-stop (like f/1.8 or f/2) creates a shallow depth of field, ideal for isolating subjects with a blurred background. Larger f-stops (like f/16 or f/22) yield greater depth of field, keeping more of the scene in focus – perfect for landscapes.
While experienced users often prefer manual aperture control for creative depth-of-field effects, beginners can comfortably start with the automatic mode. This allows the camera to select an appropriate aperture based on the light meter reading. As you gain familiarity, experiment with manual aperture to understand its impact on your images and unlock greater artistic control.
Depth of Field Explained
Depth of field (DoF) refers to the portion of your image that appears acceptably sharp. It’s fundamentally linked to the aperture you select. A lower f-number (e;g., f/1.8) results in a shallow DoF – only a narrow range is in focus, beautifully blurring the background and isolating your subject. This is excellent for portraits, drawing attention to specific details.
Conversely, a higher f-number (e.g., f/22) expands the DoF, bringing more of the scene into focus, from foreground to background. This is ideal for landscapes where you want everything sharp. Understanding DoF allows you to creatively control what the viewer focuses on, enhancing the storytelling within your photographs. Experimenting with different apertures is key to mastering this essential photographic concept.
Exposure Control & Metering
The Canon AE-1’s built-in light meter is crucial for achieving proper exposure. It analyzes the light in your scene and suggests aperture and shutter speed combinations. However, remember it doesn’t always get it right! Bracketing – taking multiple shots at slightly different exposures – is a smart technique, especially when starting. Shoot at the meter’s suggestion, then one stop faster and one stop slower.
This increases your chances of capturing a well-exposed image. The AE-1 allows both manual and automatic aperture control. While automatic is convenient, learning manual control gives you creative freedom. Understanding the relationship between aperture, shutter speed, and ISO is fundamental to mastering exposure with the AE-1.
Understanding Shutter Speed
Shutter speed dictates how long the camera’s sensor is exposed to light. Measured in seconds or fractions of a second (e.g., 1/60, 1/250), it dramatically impacts image appearance. Faster shutter speeds “freeze” motion, ideal for sports or wildlife photography. Slower shutter speeds blur motion, creating a sense of movement or allowing more light in for low-light situations.
A general rule for handheld shooting is to keep your shutter speed at or above 1/60 of a second to avoid camera shake. Lower speeds require a tripod. Experimenting with shutter speed is key to unlocking creative possibilities. Remember, a slower shutter speed needs a narrower aperture (higher f-number) to maintain proper exposure, and vice versa.
Exposure Bracketing Technique
Exposure bracketing is a valuable technique for ensuring a well-exposed photograph, especially when relying on the camera’s built-in light meter or shooting challenging lighting conditions. It involves taking multiple shots of the same scene with varying exposure settings.
Start with the exposure suggested by your light meter. Then, take one photo with the shutter speed one stop faster (less light) and another one stop slower (more light). This creates a series of images – underexposed, correctly exposed, and overexposed. This method helps you capture the perfect exposure, particularly when dealing with high-contrast scenes. Analyzing these bracketed shots will also help you learn how your camera meters light and refine your future exposure choices.
Using the Built-in Light Meter
The Canon AE-1’s built-in light meter is a crucial tool for achieving proper exposure. Located within the viewfinder, it displays a needle indicating whether your scene is underexposed, correctly exposed, or overexposed. To activate it, set the camera to ‘Av’ (Aperture Priority) or ‘M’ (Manual) mode.
Point the camera at your subject and half-press the shutter button. The needle will move. Align the needle with the ‘0’ mark for a correct exposure. If it’s to the left, increase aperture (lower f-number) or decrease shutter speed. If it’s to the right, decrease aperture (higher f-number) or increase shutter speed. Remember, the meter reads the average light, so complex scenes may require adjustments. Practice is key to mastering its use!
Focusing Techniques
The Canon AE-1 relies on manual focusing, demanding a deliberate and practiced approach. Look through the viewfinder and rotate the focusing ring on the lens until your subject appears sharpest. Utilize the split-image rangefinder in the center of the viewfinder – align the two opposing images for precise focus.
For stationary subjects, take your time and fine-tune the focus. When photographing moving subjects, pre-focus on a point where you anticipate the subject will be, then track its movement while slightly adjusting the focus ring. Remember, depth of field plays a role; a wider aperture (smaller f-number) creates a shallower depth of field, requiring more accurate focusing. Consistent practice will build muscle memory and improve your focusing speed and accuracy.
Manual Focusing with the AE-1
Mastering manual focus on the Canon AE-1 is key to unlocking its full potential. The AE-1 utilizes a split-image rangefinder within the viewfinder. This ingenious system presents two slightly offset images; when perfectly focused, these images merge into one clear view. Practice aligning these images – it’s the core skill!
Initially, it may feel slower than autofocus, but precision increases with practice. Pay attention to the focusing ring on your FD lens, making small adjustments. Remember that a shallower depth of field (achieved with lower f-numbers like f/1.8) demands more accurate focusing than a larger depth of field. Don’t rush; deliberate focusing yields sharper results. Embrace the tactile experience and enjoy the connection with your photography!
Practical Shooting Tips
To get the most from your Canon AE-1, remember these essential tips. When handholding the camera, prioritize shutter speed – aim for 1/60th of a second or faster to minimize blur. Experiment with exposure bracketing; take multiple shots at slightly different exposure settings to ensure you capture the perfect image.
Don’t be afraid to start with automatic aperture settings while you learn, but explore manual control to creatively manipulate depth of field. A smaller f-stop (like f/1.8) creates a beautifully blurred background, isolating your subject. Finally, always ensure your ISO setting matches the film speed you’re using for accurate exposures. Practice makes perfect – enjoy the process!
Handheld Shooting & Shutter Speed (1/60 Rule)
Achieving sharp images while shooting handheld with your Canon AE-1 relies heavily on shutter speed. A widely accepted guideline, often called the “1/60 rule,” suggests using a shutter speed of at least 1/60th of a second to counteract natural hand movement. Slower speeds dramatically increase the risk of motion blur, especially with longer focal length lenses.
However, this is just a starting point. Factors like your stability, technique, and the specific lens used can influence the ideal shutter speed. If you find your images consistently blurry, increase the shutter speed. Remember, prioritizing a faster shutter speed often means adjusting other settings, like aperture or ISO, to maintain proper exposure.
Popular Canon FD Lenses (50mm f/1.8, 24mm f/2.8)
The Canon FD mount offers a fantastic range of lenses, but two consistently stand out for AE-1 users: the 50mm f/1.8 and the 24mm f/2.8. The 50mm f/1.8 is a remarkably affordable and sharp “nifty fifty,” perfect for everyday shooting and portraits. Its wide aperture excels in low light and creates beautiful background blur (bokeh).
Conversely, the 24mm f/2.8 provides a wider field of view, ideal for landscapes, street photography, and situations where you need to capture more of the scene. Both lenses are known for their build quality and optical performance, offering excellent value for their price. Exploring these lenses unlocks the full potential of your Canon AE-1.
Maintenance & Care
Preserving your Canon AE-1 ensures years of reliable service. Regular cleaning is crucial; gently blow away dust from the body and lens elements with a blower. Avoid harsh chemicals or abrasive cloths. For stubborn grime, a lens cleaning solution and microfiber cloth are recommended.
Store the camera in a dry, dust-free environment, ideally in a camera bag. Periodically check the light seals – deterioration can lead to light leaks. Battery compartments should be inspected for corrosion. Proper care extends the lifespan of this classic camera, maintaining its functionality and value. Remember, preventative maintenance is key to a lasting photographic companion.
Basic Cleaning Procedures

Keeping your Canon AE-1 clean is vital for optimal performance. Begin by using a soft blower to remove loose dust and debris from the body, lens, and viewfinder. Avoid touching the lens surface with your fingers. For fingerprints or smudges, dampen a microfiber cloth with lens cleaning solution – never apply liquid directly to the camera.
Gently wipe the lens in a circular motion, starting from the center and working outwards. Clean the body with a slightly damp cloth, avoiding the battery compartment. Inspect the film chamber for dust before loading film. Regular, gentle cleaning prevents build-up and ensures clear images. Remember, patience and a light touch are essential!